
Table of Contents:
Introduction to Ice Fishing Safety: Why Ice Thickness Matters
Ice fishing is a cherished winter tradition, offering both relaxation and the thrill of the catch. However, the safety of this activity hinges on one critical factor: the thickness of the ice beneath your feet. Why does this matter so much? Because ice thickness directly determines its ability to support weight, and underestimating this can lead to life-threatening situations.
Not all ice is created equal. The strength of ice depends not only on its thickness but also on its composition, age, and environmental conditions. For instance, clear, blue ice is significantly stronger than white or slushy ice, even if they appear to be of similar thickness. This makes understanding the nuances of ice formation and its physical properties essential for anyone venturing onto frozen waters.
Moreover, ice does not freeze uniformly. Factors such as water currents, submerged vegetation, and even snow cover can create weak spots that are nearly invisible to the untrained eye. This is why relying solely on visual cues is insufficient. Instead, precise measurement and regular testing of ice thickness are non-negotiable steps to ensure safety.
Understanding ice thickness isn't just about avoiding accidents; it’s about empowering yourself to enjoy ice fishing with confidence. By learning to assess the ice properly, you not only protect yourself but also contribute to the safety of others who share the frozen expanse with you. Remember, no fish is worth risking your life for—prioritize safety, and the rewards of ice fishing will be all the sweeter.
Essential Tools for Measuring Ice Thickness
Measuring ice thickness accurately is a fundamental step in ensuring safety during ice fishing. To do this effectively, you need the right tools. Each tool serves a specific purpose, helping you assess the ice's strength and reliability before stepping onto it. Below is a breakdown of essential equipment that every ice angler should consider:
- Ice Auger: A must-have for drilling precise holes into the ice. Manual, electric, or gas-powered augers allow you to penetrate even thick ice layers with ease. Choose one based on the typical ice conditions in your area.
- Ice Chisel (Spud Bar): Ideal for testing ice thickness as you move. This long, sturdy tool lets you chip away at the surface to gauge its strength, especially in areas where the ice might be thinner.
- Measuring Tape or Stick: Once a hole is drilled, use a waterproof measuring tape or a pre-marked stick to determine the exact thickness of the ice. Ensure the tool is long enough to handle varying ice depths.
- Ice Scoop: While primarily used to clear slush from holes, an ice scoop can also help you inspect the ice's texture and composition, giving additional clues about its safety.
- Sonar Device: For a more advanced approach, portable sonar systems can provide a quick estimate of ice thickness without drilling. These devices are especially useful for larger areas.
- Thermometer: Monitoring air and ice surface temperatures can help predict changes in ice stability. While not a direct measuring tool, it’s an important accessory for assessing overall conditions.
Each of these tools plays a role in building a comprehensive understanding of the ice's condition. While some, like the ice auger, are indispensable, others, such as sonar devices, add an extra layer of precision for those who want to be extra cautious. Regardless of the tools you choose, always ensure they are in good working condition and appropriate for the environment you’re fishing in.
Investing in the right equipment not only enhances your safety but also allows you to enjoy your ice fishing experience with peace of mind. Remember, thorough preparation is the first step to a successful and secure day on the ice.
How to Assess Ice Safety Based on Thickness Guidelines
Assessing ice safety based on thickness guidelines is a critical skill for anyone venturing onto frozen waters. While general recommendations exist, understanding how to apply these guidelines in real-world scenarios can make all the difference. Here’s how to evaluate ice safety effectively:
1. Match Ice Thickness to Activity
Different activities require varying levels of ice thickness. For example, walking on ice demands a minimum of 4 inches of clear, solid ice, while snowmobiles or ATVs need at least 5-7 inches. For vehicles, the requirements increase significantly, with 8-12 inches needed for small cars and 12-15 inches for larger trucks. Always err on the side of caution and double-check the ice thickness before proceeding.
2. Account for Ice Type and Quality
Not all ice is equally strong. Clear, blue ice is the gold standard for safety, as it is denser and more stable. In contrast, white or opaque ice, often caused by air pockets or snow mixing with water, is weaker and requires double the thickness to support the same weight. Always consider the quality of the ice alongside its thickness.
3. Identify Weak Zones
Ice thickness can vary dramatically across a single body of water. Areas near shorelines, currents, bridges, or underwater springs are prone to thinner, weaker ice. Additionally, pressure ridges and cracks signal instability. Avoid these zones entirely, even if the surrounding ice appears safe.
4. Test Frequently
Ice conditions can change rapidly, especially during fluctuating temperatures. Regularly test the ice thickness as you move, particularly if you’re traveling across large or unfamiliar areas. Use tools like an ice chisel or auger to ensure consistency in your measurements.
5. Consider Group Safety
If you’re traveling with others, spread out to distribute weight evenly and reduce the risk of a group falling through thin ice. Avoid clustering in one spot, especially when drilling holes for fishing, as this can weaken the surrounding ice.
6. Stay Updated on Local Conditions
Local authorities or fishing communities often provide updates on ice conditions. Check these reports before heading out, as they can offer valuable insights into specific areas to avoid or where the ice is most stable.
By combining these guidelines with careful observation and proper tools, you can confidently assess ice safety and minimize risks. Remember, ice thickness is just one part of the equation—environmental factors and local knowledge are equally important in ensuring a safe and enjoyable experience.
Color Indicators: How Ice Appearance Reflects Its Strength
The color of ice is more than just a visual detail—it’s a critical indicator of its strength and safety. By learning to interpret these color cues, you can make more informed decisions before stepping onto frozen surfaces. Here’s what you need to know about ice appearance and what it reveals about its structural integrity:
- Clear or Blue Ice: This is the strongest and safest type of ice. Its transparency or bluish hue indicates that it is dense and formed under stable freezing conditions. Such ice is typically free of air bubbles or impurities, making it ideal for supporting significant weight.
- White or Opaque Ice: Often referred to as "snow ice," this type forms when snow partially melts and refreezes. Its cloudy appearance comes from trapped air and impurities, which weaken its structure. White ice is generally only half as strong as clear ice, meaning it requires double the thickness to support the same load.
- Gray Ice: A grayish tint signals danger. This color often means that water has mixed with the ice, either from melting or from water seeping through cracks. Gray ice is unstable and should be avoided entirely, regardless of its thickness.
- Dark or Black Ice: While it may appear solid, dark ice is a red flag. It usually indicates very thin ice or areas where water is visible beneath the surface. This type of ice is extremely hazardous and should never be trusted.
- Greenish Ice: Occasionally, ice may take on a greenish hue, especially in areas with algae or vegetation beneath the surface. While this doesn’t automatically mean the ice is unsafe, it’s a sign to proceed with caution and verify its thickness.
Recognizing these color indicators is especially important in variable weather conditions, where ice can weaken or form inconsistently. Always combine visual assessments with physical measurements to ensure a comprehensive understanding of the ice’s condition. Remember, appearances can be deceiving, so never rely solely on color without further testing.
Common Ice Hazards and How to Avoid Them
Even when ice appears safe, hidden hazards can pose significant risks. Understanding these common dangers and knowing how to avoid them is essential for ensuring your safety during ice fishing or other activities on frozen water.
1. Pressure Ridges
Pressure ridges form when expanding ice sheets collide, creating uneven, jagged surfaces. These areas are highly unstable and prone to cracking. To avoid them, stay clear of visible ridges and use binoculars to scout for irregularities in the ice surface from a distance.
2. Thin Ice Near Structures
Bridges, docks, and piers can cause localized thinning of ice due to heat transfer or water movement. Similarly, areas near inlets, outlets, or underwater springs often have weaker ice. Always maintain a safe distance from such structures and test the ice frequently if you must approach.
3. Snow-Covered Ice
Snow can act as an insulator, slowing the freezing process and masking weak spots or cracks. Avoid venturing onto snow-covered ice without thoroughly testing its thickness, as the underlying ice may be thinner than expected.
4. Air Pockets and Hollow Ice
Air pockets can form beneath the ice due to fluctuating water levels or uneven freezing. These areas may sound hollow when tapped and are highly unstable. If you suspect hollow ice, retreat immediately and test nearby areas for stability.
5. Cracks and Fractures
Cracks, especially those accompanied by loud popping sounds, indicate stress within the ice. While small cracks may not immediately pose a threat, they can quickly expand under pressure. Avoid walking or drilling near visible fractures, and always move cautiously if you hear cracking noises.
6. Changing Weather Conditions
Rapid temperature shifts can weaken ice significantly, even if it was previously stable. Warm spells, rain, or strong winds can erode the ice from above or below. Monitor weather forecasts closely and avoid the ice during periods of thawing or unstable conditions.
7. Overcrowding
Congregating in one area, especially with heavy equipment, can overload the ice and increase the risk of collapse. Spread out and maintain a safe distance from others to distribute weight evenly across the surface.
By staying vigilant and recognizing these hazards, you can minimize risks and enjoy your time on the ice with greater confidence. Always combine visual assessments with proper tools and local knowledge to ensure a safe experience.
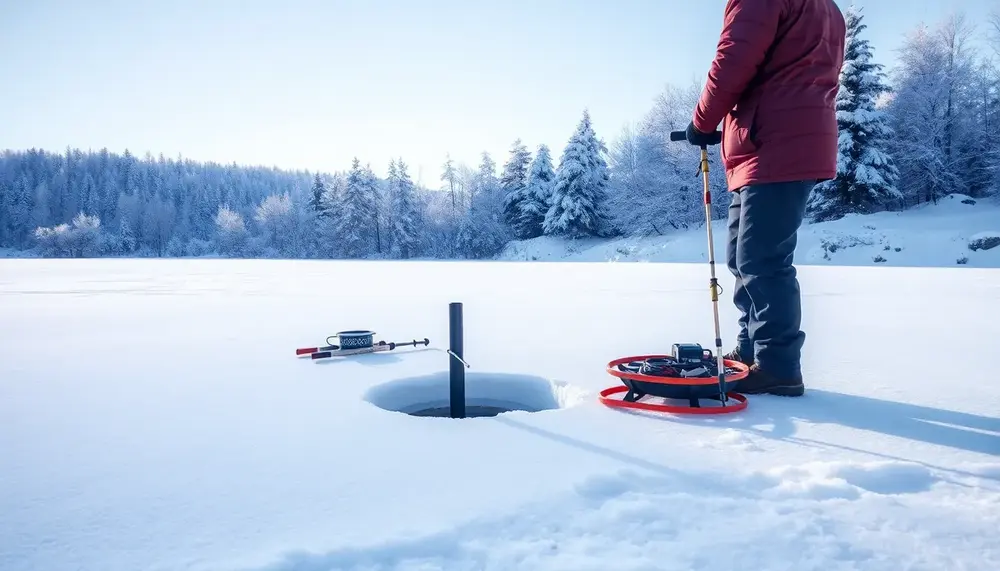
Step-by-Step Guide: Measuring Ice Thickness Safely
Measuring ice thickness safely is a step-by-step process that requires careful attention to detail and the right approach. Following these steps will help you assess the ice’s strength while minimizing risks to yourself and others.
Step 1: Choose the Right Location
Begin by selecting a spot away from known hazards such as inlets, outlets, or areas with visible cracks. Look for clear, undisturbed ice, as it is more likely to provide accurate thickness readings.
Step 2: Wear Safety Gear
Before stepping onto the ice, equip yourself with essential safety gear. This includes a pair of ice picks, a flotation device, and a rope in case of emergencies. Ensure you’re dressed warmly and have waterproof boots to protect against exposure to cold water.
Step 3: Test the Ice as You Approach
Use an ice chisel or spud bar to tap the ice in front of you as you walk. Listen for hollow sounds or observe any cracks forming. If the ice feels weak or unstable, retreat immediately.
Step 4: Drill a Test Hole
Once you’ve identified a safe-looking area, use an ice auger to drill a small test hole. Ensure the hole is clean and free of slush for an accurate measurement. If you don’t have an auger, a sturdy ice chisel can also be used to create a hole.
Step 5: Measure the Thickness
Insert a measuring stick or tape into the hole until it touches the bottom of the ice. Pull it back up and note the measurement at the surface level. For added accuracy, repeat this process in multiple nearby spots to confirm consistency.
Step 6: Evaluate the Ice Type
While measuring, observe the ice’s appearance and texture. Clear, solid ice is preferable, while cloudy or slushy ice may require additional caution. If the ice is layered, measure each layer individually to assess its overall strength.
Step 7: Monitor Conditions Continuously
As you move across the ice, continue testing at regular intervals, especially if you notice changes in color, texture, or sound. Ice conditions can vary even within short distances, so frequent checks are essential.
By following this step-by-step guide, you can measure ice thickness effectively and ensure a safer experience on frozen waters. Always prioritize caution and never assume uniformity in ice conditions, no matter how stable it may appear.
Real-Life Scenarios: Identifying Safe Ice Conditions for Fishing
Understanding ice safety becomes much clearer when applied to real-life scenarios. Each situation presents unique challenges, and knowing how to interpret the conditions can make all the difference. Below are practical examples to help you identify safe ice conditions for fishing:
Scenario 1: Early Winter Ice Formation
It’s the start of the season, and temperatures have just dropped below freezing consistently. In this case, prioritize smaller, shallow lakes or ponds, as they freeze faster than larger bodies of water. Look for clear, blue ice and avoid areas with snow cover, as the ice beneath may still be forming. Test the ice every few feet to ensure it has reached the minimum safe thickness for walking (4 inches).
Scenario 2: Mid-Winter Fishing on a Large Lake
During the peak of winter, large lakes often have thick, stable ice. However, these lakes can have areas of varying thickness due to currents or underwater springs. When fishing on a large lake, stick to well-traveled paths or areas where other anglers have already tested the ice. Avoid venturing into secluded or unfamiliar zones without thoroughly checking the ice yourself. Pay attention to local reports, as they often highlight safe fishing spots.
Scenario 3: After a Heavy Snowfall
Snowfall can insulate the ice, slowing its growth and hiding weak spots. In this scenario, clear away snow from a small area to expose the ice before testing its thickness. Be cautious of slushy layers beneath the snow, as they indicate weaker ice. If the ice appears white or opaque, double-check its thickness, as it may not support as much weight as clear ice.
Scenario 4: Late Winter Thaw
As temperatures rise, ice begins to weaken, even if it still appears thick. In late winter, avoid fishing near shorelines, as the ice here thaws first. Check for signs of deterioration, such as dark patches, water pooling on the surface, or honeycombed textures. If you notice any of these indicators, it’s time to pack up and leave the ice immediately.
Scenario 5: Fishing Near Inlets or Outlets
Inlets and outlets are hotspots for fish but also for unstable ice. Water movement in these areas prevents ice from freezing uniformly. If you plan to fish near these locations, stay well back from visible currents and test the ice frequently. Look for clear, solid ice away from the flow of water.
By applying these real-life examples, you can better understand how to adapt to changing ice conditions and make informed decisions. Always combine visual observations with physical testing, and never take unnecessary risks, no matter how tempting the fishing spot may seem.
The Role of Weather in Ice Formation and Its Impact on Thickness
Weather plays a pivotal role in ice formation and directly influences its thickness, strength, and overall safety. Understanding how various weather conditions impact ice can help you predict its stability and plan your activities more effectively.
Temperature Fluctuations
Consistently cold temperatures are the primary driver of ice formation. When the air temperature remains below freezing for several days, ice thickens steadily. However, rapid temperature fluctuations—such as warm days followed by freezing nights—can create weak layers within the ice. These layers are less cohesive and more prone to cracking under pressure.
Wind and Ice Growth
Wind significantly affects how ice forms. Calm conditions allow for smooth, uniform ice growth, while strong winds can disrupt the freezing process by creating ripples or pushing water to different areas. Wind can also accelerate melting during warmer periods, especially along shorelines or exposed sections of the ice.
Snow Cover and Insulation
Snow acts as an insulating layer, slowing down the freezing process beneath it. While this might preserve existing ice during brief warm spells, it also prevents new ice from forming efficiently. Thick snow cover can lead to uneven ice thickness, with thinner areas hidden beneath the surface. Additionally, the weight of snow can press down on the ice, causing water to seep up and create slushy, unstable layers.
Rain and Melting
Rain, even in small amounts, can weaken ice by increasing surface water and accelerating melting. Prolonged rain events can erode the ice from both above and below, particularly if combined with rising temperatures. After heavy rain, the ice often becomes porous and loses its structural integrity, making it unsafe for any activity.
Daylight and Sun Exposure
Sunlight is another critical factor in ice thickness. Direct exposure to sunlight, especially during longer days in late winter, can warm the ice surface and create weak spots. South-facing areas, which receive more sunlight, often melt faster than shaded regions, leading to uneven ice conditions.
Cold Spells and Rapid Ice Growth
During sudden cold spells, ice can grow quickly, but this rapid formation often results in brittle, less stable ice. The surface may appear solid, but internal stress cracks can form due to the fast freezing process. Always test newly formed ice thoroughly, even during extreme cold.
By closely monitoring weather patterns and their effects on ice, you can better anticipate changes in thickness and stability. Combine this knowledge with regular ice testing to ensure a safe and enjoyable experience on frozen waters.
Safety Gear Checklist for Ice Fishing Activities
When heading out for ice fishing, having the right safety gear can make the difference between a successful trip and a dangerous situation. Below is a carefully curated checklist of essential equipment to ensure your safety while enjoying the frozen outdoors:
- Ice Picks: These handheld tools are vital for self-rescue if you fall through the ice. Keep them accessible around your neck or in an easy-to-reach pocket.
- Flotation Device: A lightweight, insulated life jacket or floatation suit provides both warmth and buoyancy in case of an emergency.
- Rope: Carry a sturdy, waterproof rope (at least 50 feet) with a float attached. This can be thrown to someone in distress or used to secure yourself during risky conditions.
- Whistle: A loud whistle is an effective way to signal for help if you’re in trouble, especially in low-visibility conditions.
- Waterproof Bag: Store your phone, GPS device, and other electronics in a waterproof bag to keep them functional in wet or icy conditions.
- Headlamp or Flashlight: Winter days are short, and visibility can drop quickly. A reliable headlamp ensures you can navigate safely in low light.
- Thermal Blanket: Compact and lightweight, thermal blankets are crucial for retaining body heat in emergencies.
- First Aid Kit: Include essentials like bandages, antiseptic wipes, and hand warmers to address minor injuries or frostbite.
- Traction Cleats: Ice can be slippery, so attach cleats or spikes to your boots for better grip and stability.
- Hand and Foot Warmers: Prolonged exposure to cold can lead to frostbite. Disposable warmers are an easy way to keep extremities protected.
- Emergency Shelter: A portable ice fishing tent or thermal shelter can provide protection from sudden weather changes and extreme cold.
- Multi-Tool or Knife: A versatile tool can assist with cutting rope, repairing gear, or other unexpected tasks.
Equipping yourself with these items ensures you’re prepared for a variety of scenarios, from minor inconveniences to critical emergencies. Always double-check your gear before heading out, and remember that preparation is the key to a safe and enjoyable ice fishing experience.
What to Do in an Emergency: Staying Safe if the Ice Breaks
Falling through the ice is a terrifying scenario, but knowing how to respond quickly and effectively can save your life. In an emergency, staying calm and following these steps is crucial to ensuring your safety:
1. Stay Calm and Control Your Breathing
The initial shock of cold water can cause hyperventilation. Focus on taking slow, controlled breaths to prevent panic and conserve energy. Keeping your head above water is your first priority.
2. Avoid Sudden Movements
Thrashing or panicking can cause you to lose energy faster and may worsen the situation. Instead, spread your arms out on the ice to distribute your weight and prevent sinking further.
3. Turn Towards the Direction You Came From
The ice behind you is more likely to be stable since it supported your weight before breaking. Face the direction you came from and prepare to climb out.
4. Use Ice Picks or Your Elbows
If you have ice picks, use them to grip the ice and pull yourself up. If not, use your elbows or forearms to create leverage. Kick your legs behind you to propel your body horizontally onto the ice.
5. Roll Away from the Hole
Once you’re back on the ice, avoid standing up immediately. Instead, roll away from the hole to distribute your weight and reduce the risk of breaking through again. Move to a safe area where the ice is thicker.
6. Signal for Help
If others are nearby, call out for assistance. Use a whistle or wave your arms to attract attention. Avoid re-entering the water unless absolutely necessary to help someone else.
7. Warm Up Gradually
Hypothermia is a serious risk after being in freezing water. Remove wet clothing as soon as possible and replace it with dry, insulated layers. Use hand warmers or a thermal blanket if available, and seek shelter immediately. Avoid direct heat sources like fires, as they can cause shock to your system.
8. Seek Medical Attention
Even if you feel fine, it’s important to get checked by a medical professional. Cold water immersion can have delayed effects on your body, including hypothermia or cardiac complications.
Preparation and awareness are your best defenses against emergencies on the ice. Always carry safety gear, inform someone of your plans, and stay vigilant to minimize risks.
Conclusion: Prioritizing Safety for an Enjoyable Ice Fishing Experience
Ice fishing is a rewarding winter activity, but its enjoyment hinges on one fundamental principle: safety. By prioritizing preparation, awareness, and proper techniques, you can transform a potentially hazardous endeavor into a secure and memorable experience.
Adaptability is Key
Ice conditions are dynamic, influenced by weather, location, and time of year. A successful outing requires not only the right tools but also the ability to adapt to changing environments. Observing subtle signs, such as shifts in ice texture or unexpected temperature changes, can be the difference between safety and danger.
Community Knowledge Enhances Safety
Leverage the expertise of local anglers and community reports. These sources often provide real-time insights into ice conditions, helping you avoid high-risk areas. Collaboration with others fosters a shared sense of responsibility, ensuring everyone benefits from collective vigilance.
Balance Confidence with Caution
While experience builds confidence, overconfidence can lead to complacency. Even seasoned anglers must approach each trip with respect for the unpredictability of nature. Treat every frozen surface as unique, testing and verifying conditions as if it were your first time.
Ultimately, the true reward of ice fishing lies not just in the catch but in the journey itself. By prioritizing safety, you ensure that each trip is not only enjoyable but also a testament to careful planning and respect for the natural world.
FAQ: Ice Fishing Safety and Ice Thickness
What is the minimum ice thickness required for walking safely?
The minimum ice thickness for safe walking is 4 inches (approximately 10 cm) of clear, solid ice. Avoid thinner or slushy ice, as it may not support your weight.
How can I identify safe ice based on its color?
Safe ice is usually clear or has a bluish tint, as it indicates dense, stable ice. Avoid gray, dark, or opaque ice, as these often signal weaker or melting ice.
What tools are essential for measuring ice thickness?
Essential tools include an ice auger for drilling, a measuring stick or tape to gauge thickness, and an ice chisel for testing the surface as you move. A portable sonar device can also add precision.
What areas of ice should always be avoided?
Avoid areas near inlets, outlets, flowing water, bridges, and pressure ridges. These zones are prone to thinning and instability due to water currents and structural stresses.
What safety gear should I carry when ice fishing?
Essential safety gear includes ice picks, a flotation device, a sturdy rope, thermal blankets, waterproof bags, and traction cleats. These items can help in emergencies and ensure better preparedness on the ice.