
Table of Contents:
Choosing the Right Saltwater Fishing Line for Your Trip
Picking out the right saltwater fishing line isn’t just about grabbing whatever’s on sale at the tackle shop. You want something that matches your target species, the places you’ll fish, and—let’s be honest—your patience for tangles and maintenance. If you’re coming from fly fishing, this whole world of monofilament, fluorocarbon, and braid might seem a bit, well, overwhelming. But here’s the lowdown that actually matters for your trip:
- Braid for Versatility and Strength: Braid line is a top pick for coastal trips, especially when you’re not sure what’s lurking below. It’s thin, strong, and casts a mile. For most East and West Coast inshore fishing (think Jersey Shore or Oregon’s rocky spots), a 20–30 lb test braid covers almost everything from surf perch to rockfish. Plus, it’s less stretchy, so you’ll feel even the lightest nibble.
- Monofilament for Forgiveness: If you’re worried about line tangles or you want something super easy for family members to use, monofilament is your friend. It’s cheaper, stretches a bit (which helps prevent break-offs), and is a breeze to tie knots with. Go for 12–20 lb test if you’re mostly after medium-sized fish. Just remember, mono can get chewed up by rocks and salt, so keep an eye on it.
- Fluorocarbon for Stealth: Sometimes, especially in clear water or when fish are finicky, adding a fluorocarbon leader (15–25 lb test) to your main line makes a real difference. It’s nearly invisible underwater and resists abrasion. You don’t need a full spool—just a few feet at the end of your setup.
One last thing: always check that your chosen line is labeled as saltwater-resistant. Some bargain lines just can’t handle the salt and sun, and you don’t want your gear failing mid-trip. Trust me, nothing ruins a day faster than a snapped line when you finally hook into something big. So, spend a few extra bucks for quality—your future self will thank you.
Gathering Essential Tools and Components for Line Setup
Before you can even think about tying knots or spooling up, you’ll need a handful of tools and components—otherwise, you’ll end up frustrated and probably a little salty (pun intended). Having the right gear at arm’s reach makes the whole process smoother, especially if you’re new to conventional setups or prepping equipment for a group.
- Saltwater Reel and Rod: Make sure your reel is designed for saltwater use, with corrosion-resistant parts. The rod should match the reel and line weight, and be sturdy enough for the species you’re targeting.
- Line Spooler or Pencil: A line spooler makes loading line onto your reel a breeze, but honestly, a pencil through the spool and a friend to hold it works in a pinch.
- Sharp Scissors or Line Clippers: You’ll need these for trimming line ends cleanly. Dull scissors just fray the line, which is a recipe for disaster.
- Swivels and Snaps: These little connectors prevent line twist and make swapping rigs super fast. Grab a few in different sizes.
- Sinkers and Weights: The surf and current at the coast can be wild, so bring a selection of sinkers—pyramid, egg, or bank sinkers cover most situations.
- Hooks: Pick a range of sizes, but don’t overthink it. Circle hooks (sizes 2 to 2/0) are a safe bet for most inshore fish and are easier on the fish if you plan to release them.
- Leader Material: A spool of fluorocarbon or monofilament leader is essential for abrasion resistance and stealth, especially around rocks or pilings.
- Knot-Tying Tool (Optional): If you’re not confident with knots or your fingers are cold and clumsy, a simple knot-tying tool can be a lifesaver.
Honestly, you don’t need a mountain of gear. Just the basics, chosen wisely, will set you up for a hassle-free start—whether you’re fishing solo or showing someone else the ropes. Don’t skimp on the essentials; they make all the difference between a smooth setup and a headache before you even cast out.
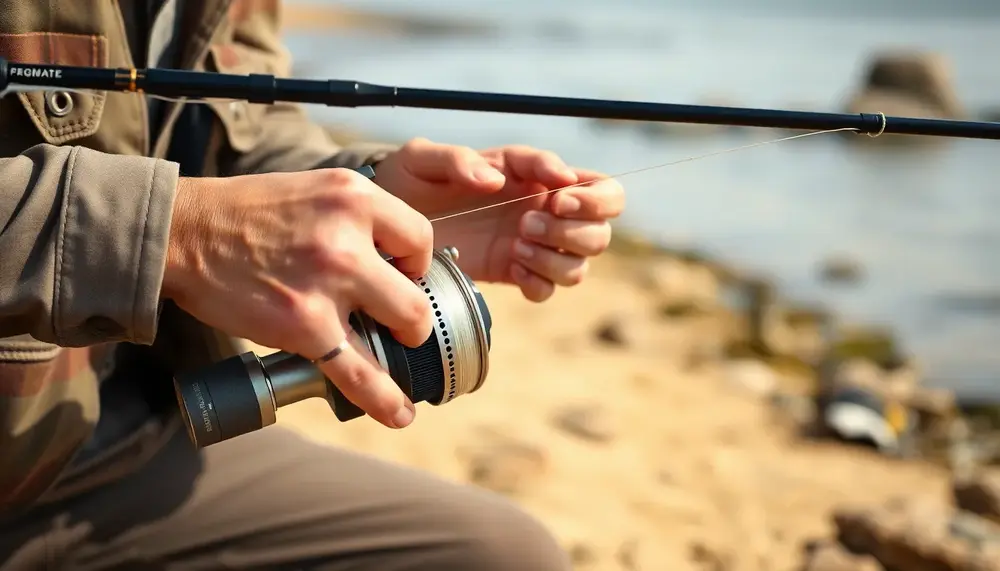
Spooling the Reel with the Correct Line
Getting your reel spooled properly is where the magic starts—or, well, where the headaches begin if you skip a step. The right technique keeps your line smooth, tangle-free, and ready for whatever the ocean throws at you. Here’s how to do it right, even if you’ve never touched a spinning or baitcasting reel before:
- Check the Reel’s Capacity: Look for the line capacity info on your reel. Overfilling or underfilling messes with casting and drag. Stick to the recommended range for your chosen line type and strength.
- Thread the Line Correctly: Open the bail (for spinning reels) or disengage the spool (for baitcasters). Run the line through each rod guide, starting at the tip and working down to the reel. Miss a guide, and you’ll regret it on your first cast.
- Secure the Line to the Spool: Use an arbor knot or a simple overhand knot to tie the line to the spool. Tighten it down so it won’t slip, but don’t overdo it—no need to crush the spool.
- Apply Steady Tension: As you wind the line onto the spool, keep gentle, even tension. Pinch the line lightly between your fingers or use a soft cloth. This helps prevent loose coils and future bird’s nests.
- Fill to the Right Level: Stop spooling when the line sits about 1/8 inch below the spool’s rim. Too much line and you’ll get tangles; too little and your casting distance suffers.
- Double-Check for Twists: If you notice the line twisting or looping, pause and let it dangle freely. This lets the twists unwind before they become a problem on the water.
Take your time here—rushing this step is a rookie mistake that’ll haunt you all day. A properly spooled reel feels smooth, casts far, and gives you a fighting chance when a big fish finally bites. And hey, it’s kind of satisfying to see that fresh line stacked up perfectly, isn’t it?
Attaching the Leader to Your Main Line
Connecting a leader to your main line is one of those steps that separates a thrown-together rig from a setup that’s ready for real saltwater action. The leader absorbs shock, resists abrasion, and can make your bait presentation look way more natural. But, if you botch the connection, you risk losing fish or wasting time untangling knots. Here’s how to nail it:
- Choose the Right Knot: For most saltwater setups, the Double Uni Knot or FG Knot are top choices. The Double Uni is easier for beginners and holds strong; the FG Knot is sleeker and passes through guides smoothly, which is handy for longer leaders.
- Match Your Diameters: Try to pair leader and main line that are similar in diameter. If the leader is much thicker, it can create a bulky knot that catches on rod guides and weakens the connection.
- Leader Length Matters: A leader of 18–36 inches is typical for inshore saltwater fishing. Shorter leaders are easier to cast and handle, while longer ones give extra protection in rocky or abrasive environments.
- Moisten Before Tightening: Always wet the knot before pulling it tight. This reduces friction and helps the knot cinch down smoothly, keeping its strength.
- Trim Tag Ends Neatly: Use sharp clippers to snip off excess line close to the knot. Leave just a tiny bit—about 1/8 inch—so the knot doesn’t slip but won’t snag on anything.
Getting this connection right is worth the extra couple of minutes. A solid leader-to-main line join means fewer lost fish, less frustration, and a setup that’ll stand up to whatever the salt throws at you. Once you’ve done it a few times, it’ll feel second nature—promise.
Tying Reliable Knots for Saltwater Fishing
Saltwater fishing demands knots that won’t slip, snap, or unravel under pressure. You need connections that hold up against big, unpredictable fish and the constant wear of salt and sand. Here’s what really matters when it comes to knot-tying for the coast:
- Palomar Knot: This knot is a workhorse for tying hooks, swivels, or lures directly to your line. It’s quick, strong, and easy to tie—even with cold, wet fingers. The double line wrap gives it extra security, which is crucial when you’re dealing with aggressive saltwater species.
- Improved Clinch Knot: Ideal for lighter lines and terminal tackle, this knot offers a balance of strength and simplicity. It’s a favorite for attaching smaller hooks or snaps, especially when you want a low-profile connection that won’t spook wary fish.
- Loop Knot (Non-Slip Loop): Sometimes you want your bait or lure to move more naturally. The non-slip loop knot creates a small loop at the end of your line, giving your presentation more action in the water. It’s especially handy for soft plastics or live bait.
- Snell Knot: If you’re using circle hooks for catch-and-release, the snell knot is a must. It aligns the hook perfectly for solid hookups and is less likely to cause deep hooking, which is better for the fish.
Practice these knots at home before you hit the water. A little muscle memory goes a long way when the wind’s howling or your hands are numb. Reliable knots aren’t just about landing fish—they’re about confidence every time you cast out.
Adding Terminal Tackle: Swivels, Sinkers, and Hooks
Once your line and leader are joined, it’s time to build out the business end of your rig. Terminal tackle—swivels, sinkers, and hooks—makes all the difference in how your bait presents and how well you handle changing surf or current. The right combination keeps your setup tangle-free and ready for action, even if the conditions get a bit wild.
- Swivels: Use a barrel or ball-bearing swivel to connect your leader to your main line or directly to your rig. This prevents line twist, especially when using spinning baits or fishing in strong current. Choose a size that matches your target species—too big, and it spooks fish; too small, and it may fail under pressure.
- Sinkers: The type and weight of sinker depend on the water movement and bottom structure. Pyramid sinkers dig into sandy surf, holding your bait in place, while egg sinkers are better for rocky or mixed bottoms, letting your bait drift naturally. Start with 1–3 oz weights and adjust as needed; you want enough weight to hold bottom but not so much that it buries your bait.
- Hooks: Match hook size and style to your bait and target fish. For surf perch or rockfish, a size 2 to 1/0 circle or bait hook is usually spot-on. If you’re using soft plastics, consider a wide-gap hook for better hooksets. Always check that your hooks are sharp—dull points lose fish, period.
Don’t forget to test your rig’s movement in the water if possible. A quick check in the shallows can reveal if your bait is spinning, snagging, or sitting just right. Adjust as needed—sometimes the smallest tweak makes all the difference between a slow day and a full cooler.
Quick Example: Setting Up for Rockfish and Surf Perch
Here’s a straightforward setup tailored for both rockfish and surf perch—two classic targets for coastal anglers. This example is built for adaptability, so you can tweak it on the fly if conditions change or you want to hand the rod off to a beginner.
- Main Line: Use a 20 lb braided line for maximum sensitivity and strength, ideal for feeling subtle bites among rocks or in the surf.
- Leader: Attach a 24-inch section of 15 lb fluorocarbon leader to help reduce visibility and resist abrasion from rocky structures or shell beds.
- Rig Type: Opt for a simple hi-lo (double dropper) rig. This allows you to present two baits at different depths, increasing your odds if fish are scattered.
- Hooks: Tie on two size 2 circle hooks, spaced about 12 inches apart. This size works well for both species and helps with safe catch-and-release.
- Sinker: Add a 2 oz pyramid sinker at the bottom of the rig. This weight holds well in surf and keeps your bait in the strike zone.
- Bait: Use small strips of squid or sandworms for rockfish, and sand crabs or shrimp for surf perch. If you’re not sure what’s biting, alternate baits on each hook.
- Swivel Connection: Attach the top of your rig to the main line with a small barrel swivel to minimize line twist and make swapping rigs quick.
With this setup, you’re ready to fish rocky jetties, sandy beaches, or piers—no overthinking required. Just cast out, keep your line tight, and be ready for that first telltale tap. Adapt as needed, but this rig will get you in the game fast, whether you’re a seasoned angler or just getting your feet wet.
Final Inspection and Saltwater-Specific Maintenance Tips
Before you hit the water, a thorough inspection can save you from frustration—or worse, gear failure—when the action heats up. Saltwater is notorious for finding weak spots and turning small oversights into big problems. Here’s what you should check and how to keep your setup running smooth, trip after trip:
- Inspect All Connections: Tug gently on every knot and connection point. Look for fraying, slippage, or any signs of weakness. If something feels off, retie it now rather than risk losing a fish later.
- Check for Corrosion: Examine metal parts like swivels, snaps, and hook eyes for any hint of rust or pitting. Even a tiny spot can spread quickly in saltwater, so swap out anything questionable.
- Verify Line Lay: Spin the reel and watch how the line sits on the spool. It should be even, with no bulges or gaps. Uneven line lay can cause tangles and casting issues.
- Rinse After Every Trip: As soon as you’re done fishing, rinse your rod, reel, and terminal tackle with fresh water. Don’t soak—just a gentle spray to remove salt. Let everything dry fully before storage.
- Lubricate Moving Parts: Apply a drop of reel oil to handles, bail arms, and other moving pieces. This keeps everything turning smoothly and blocks salt from working its way in.
- Store Properly: Keep your gear in a cool, dry place. Loosen the drag on your reel before storage to prevent the washers from sticking or compressing over time.
- Regularly Replace Line: Saltwater breaks down even the best line over time. If you notice nicks, discoloration, or stiffness, cut off the damaged section or replace the whole spool if needed.
These habits don’t just protect your investment—they make sure your next trip starts with confidence, not repairs. A few minutes of care now mean more time fishing and less time fixing, and honestly, that’s what it’s all about.
FAQ: Getting Started with Saltwater Fishing Line Setup
What fishing line type is best for saltwater beginners?
Braid is highly recommended for saltwater beginners due to its strength, versatility, and thin diameter, typically in the 20–30 lb test range. Monofilament is also a user-friendly, budget option for those seeking easier knot tying and a bit more stretch.
How do I properly spool saltwater fishing line onto my reel?
Feed your line through each rod guide, tie it securely to the spool, and wind it on while maintaining even tension. Fill until the line is about 1/8 inch below the rim of the spool to maximize casting distance and prevent tangles.
Do I need a leader for saltwater fishing, and how long should it be?
Yes, a leader—often a 18–36 inch length of fluorocarbon or monofilament—improves abrasion resistance and reduces visibility, especially around rocks or in clear water. Connect it to your main line with a strong knot like the Double Uni or FG knot.
What basic terminal tackle do I need for inshore saltwater fishing?
For inshore saltwater fishing, you’ll need swivels, sinkers (like pyramid or egg sinkers), circle hooks (sizes 2 to 2/0), and appropriate leader material. These components help reduce tangles, present bait effectively, and handle various coastal conditions.
How can I protect my gear from saltwater damage?
Rinse your rod, reel, and tackle with fresh water after every trip, dry thoroughly, and store in a cool, dry place. Regularly check for corrosion and lubricate moving parts to prevent salt-related damage and ensure smooth operation.